|
Music Technology students at Capital University were tasked with recording the school’s symphonic wind ensemble. The ensemble recorded 3 pieces. To accomplish this task, the normal method would have been to set up all the microphones in the concert hall, plug in the XLR cables into very old wall panels, and patch the signals to Studio A, which is down the hall and around the corner. However, since the copper cabling is so old (and probably rat food within the hallowed walls) it had become inefficient to continue to use this method for recording high quality sources. Many of the input channels on the wall were either noisy, or no longer worked at all. This was problematic when many channels are needed to record large ensembles in the concert hall. Luckily, the University had just recently purchased a RedNet system by Focusrite. Red Net allows the transmission of high quality audio over Ethernet cables, which are relatively inexpensive. Music Tech major Matt Heim said “Instead of having a million cable runs and patches everywhere, you only have one Ethernet cable running down the hall into the studio from the mobile Red Net rack. It is a much more robust and dependable system than relying on traditional copper wiring.” The interface is all digital, meaning that preamp control, phantom power, and pads are all controlled via a computer program called Red Net Control. In addition, Input and output channels on the Red Net rack can be routed virtually anywhere using a virtual patch program called Dante Controller. The recording session went very smoothly, with extremely clean mic signals and excellent levels. The Decca Tree technique was used, and a few spot mics within the ensemble. Heim said “The best part about the system is how easy it is to set up. Once the Ethernet cable is plugged in, all the components automatically sync together without the need to troubleshoot clocking, sample rate, etc.” The students can conclude that Red Net makes for a very convenient live recording rig, but will it begin to infiltrate the isolated environments of recording studios? With its easy set-up, accessible virtual patching, and cheap cost of Ethernet cabling, one would certainly hope so.
0 Comments
This week I put together my audio resume, which is basically a narrated description of some of the best work I've done over the past 4 years. Check it out below.
Below is the final mix of my last recording project. It is a cover of the Led Zeppelin tune, "Hey Hey What Can I Do?" performed by "The 5th House."
I was very excited to be tracking a group called "The 5th House" which consists of vocals, guitar, bass, and drums for my final recording project. The elected to record a cover of Led Zeppelin's "Hey Hey What Can I Do." Before the day of the session, I was sure to acquire any important information that I would need to begin formulating my plan. I asked questions regarding amplifier vs DI, live tracking vs overdubbing, and I also asked for demo recordings so that I could get an idea of the groups' sound. This info helped me plan my mic setup and preamp selection on the day of the session. The session went very smoothly, I was able to use some compression on the way in for kick, snare, and vocals. We decided to overdub vocals, acoustic guitar, and mandolin. I decided to have the guitarist double track the acoustic guitar to help achieve they very wide and powerful strumming sound that is heard on the original recording. Below are some pics of the session.
I had fun in the mix process, focusing on punchy drums, up-front vocals, and a wall of guitars. I added subtle delay effects throughout the tune and also light reverb. I also used an alternate vocal take as a doubled vocal effect during the choruses, and decided to automate the panning hard left and right. Take a listen to my mix below.
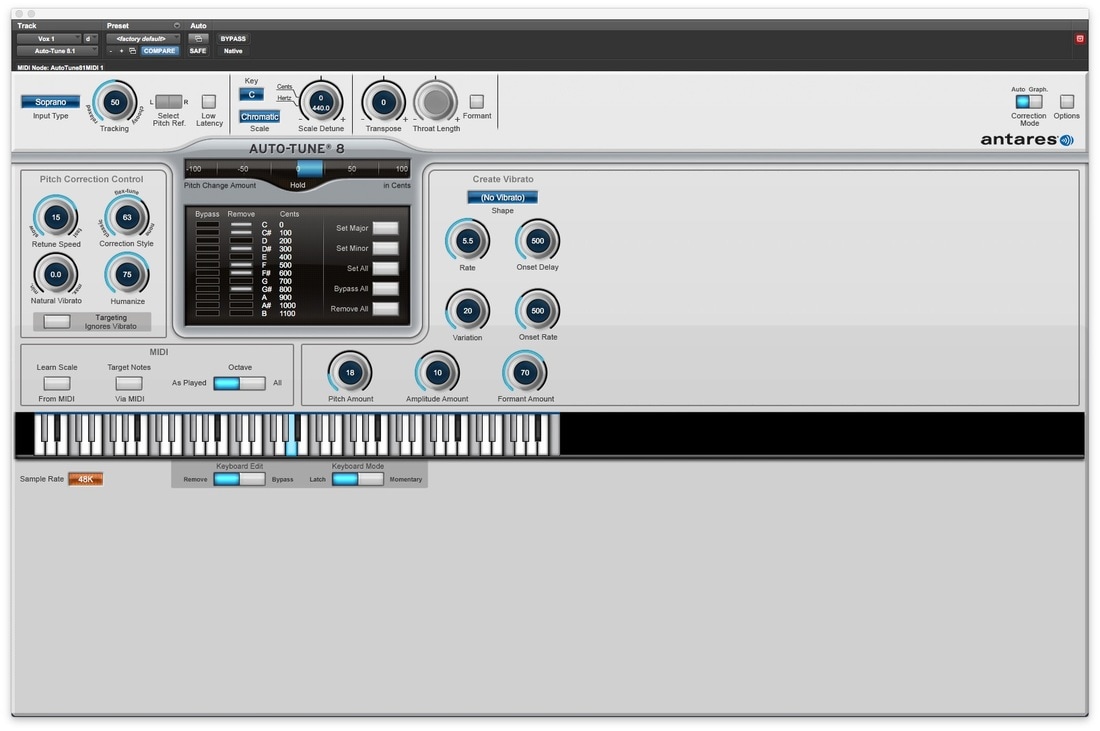
This week I mixed a R&B tune with a lot of great vocal harmonies and layers. Some of the harmonies were a little off key, so I practiced my autotune skills in order to tighten up the harmonies. Autotune can be overwhelming at first, the interface has lots of buttons and knobs that aren't completely clear as to what they control or adjust. But after playing around with it for a bit, I was able to get some pretty convincing results. Here is a screenshot of what the autotune window looks like while operating in real time on the lead vocal.
As you can see, the vocalist was a little flat on that particular note, which is why the blue meter is glowing to the right. If the note was sharp, it would glow to the left. It is easy to push the plugin too hard, and that results in the "T-Pain" effect, where the notes get retuned so fast that it sounds unnatural and robotic. Sometimes that is exactly the kind of sound that is desired, and other times it is not. In this case, I wanted a smooth and unnoticeable autotune effect. I set the algorithm to a moderately quick retune speed, and a fairly high "humanize" setting. Humanizing the algorithm helps to prevent the robotic sound mentioned above. Below is a screenshot of the keyboard interface that identifies which note is being sung in real time.
In this case, an E was being sung, according to the blue highlighted note. Sometimes the keyboard doesn't know exactly which note to pinpoint, which is why I have removed certain notes from the keyboard, as shown in grey. Removing these notes tells the plugin that these notes are not an option to retune the vocalist to. I effectively identified the key in which the song is sung, so that only the notes within the key are an option to adjust to. This step made a huge difference in the accuracy of the tuning. The unnatural wavering and incorrect notes that the plugin that were correct were eliminated, and the harmonies sounded excellent when blended all together. Here is the track below, check it out!
The next compressor I tried was the Empirical Labs Distressor. When set to a light compression setting, the pumping was very audible, which was very surprising to me. The soft hits were not brought very much, but the loud hits were compressed very hard. When applying an aggressive compression setting, The soft hits were more audible, but the loud hits were squashed to an extreme. If you want a squashed snare drum sound, this is one way to achieve it. Audio examples below:
The next compressor I chose was the Neve 543. When applying a soft compression setting, the compression really helped to beef up the low end frequencies and introduced a very slight pumping effect. When applying an aggressive compression setting, The snare sounded very punchy with some nice low end. This was a very natural sound in my opinion, and would cut through a mix very well. Audio examples are below:
Last but not least was the Daking 500 compressor. With this model, the user has very little control over the attack and release times, ratio, and whether or not to compress or limit the signal. For some, this would be an inconvenience For others, it allows one to focus on the sound rather than tweak a million different knobs all day. When applying a light compression, the higher frequencies seemed to be brought out, amounting to a very transparent sound. When applying aggressive compression, The frequency response was maintained, but a much more obvious pumping effect was heard. Audio examples below:
My compressor rankings within the light compression category are as follows:
1. Neve 543 2. Daking 500 3. Distressor 4. Chandler Germanium I chose the Neve 543 as best because I believe it added just the right amount of punch to the hits, and also added the right amount of low end to each hit. My compressor rankings within the aggressive compression category are as follows: 1. Distressor 2. Neve 543 3. Daking 500 4. Chandler Germanium I chose the Distressor as best because I believe it showcases a great pumping sound for when an engineer wants that kind of character. It wouldn't work in all cases, but when it's needed, it can deliver killer results with a lot of ability to fine tune the sound. Recording a wind ensemble within a concert hall is much different than recording a band in a studio. Everything from the way you position a microphone to the type of preamps you choose is different. Microphones are placed within the Hall, as well as in front of various sections of the ensemble. These are commonly referred to as "spot mics" and act as subtle reinforcement if needed. Most of the recorded sound will be comprised of the stage and hall mics. Mic position is key since phasing can quickly become a concern if proper distances and directionality are not maintained. When considering mic placement, sound localization should also be considered. It is important to decide how the direction we hear each instrument from within the mix should be handled, either mellow or aggressive and sharp (does the xylophone player sound like it is resonating from far stage right, or more in the center?.) A Decca tree configuration is a tried and true technique to capture great results. The Decca tree is a three omni-directional microphone setup. The first two mics are positioned in a spaced pair configuration, and panned hard left and right in the mix. The third mic is placed in the middle of the other two and slightly in front. This mic helps to provide additional localization of where the sounds are coming from. The tree is usually placed right behind the conductor, helping to achieve a decent blend between the sound of the hall and the instruments directly.
Sources: www.bedroom-recording.com/decca-tree.html davidmaslanka.com/recording-the-wind-ensemble-music-of-david-maslanka/
Over the past week, I've molded Funk Worthy's cover of "If You Want Me to Stay" by Sly and the Family Stone into a very punchy tune. I'm happy with where everything is sitting in the mix.
To help me achieve balance, I employed some parallel compression on the drums. I'm running all my drum mics through a vacuum tube compressor/limiter plugin called "Bud Driver." This really helps to add punch without a perceived increase in volume. On my kick and snare, I chose to use Waves H-Comp compressor coupled with the Waves H-EQ. I find I can get great drum sounds when using the H-series plugins from Waves. With just a touch of reverb on the snare, my drums are done. For the bass that was recorded clean with a DI, I ran through the CLA Bass plugin, then an H-EQ, a Sans-amp , and finally crushed it with a Waves CLA-2A compressor. For the guitars, I chose to gently run one of the two mics on the amp through the CLA Guitars plugin. The other I chose to simply EQ since I enjoyed the tone I heard from the mic without any further treatment. For the guitar DI track, I chose to reamp through a Roland amp so that I could get a real twangy funk tone. I felt that the saxophone was a bit harsh, so I chose to introduce some harmonics by employing the saturation knob plugin in combination with some basic EQ. For vocals, I relied upon EQ, moderate compression, and again some excitement from the saturation knob plugin. For effects, I chose to apply a gentle chorus to one of the guitar tracks, as well as slight reverb for another guitar track. I am continually impressed by Lexicon's MPX-L reverb plugin, so I decided to insert it into my vocal chain. There is also slight vocal delay from Native Instruments Replika plugin. I had a lot of fun mixing this tune, and hope to record and mix more with Funk Worthy in the future. Enjoy the final mix below!
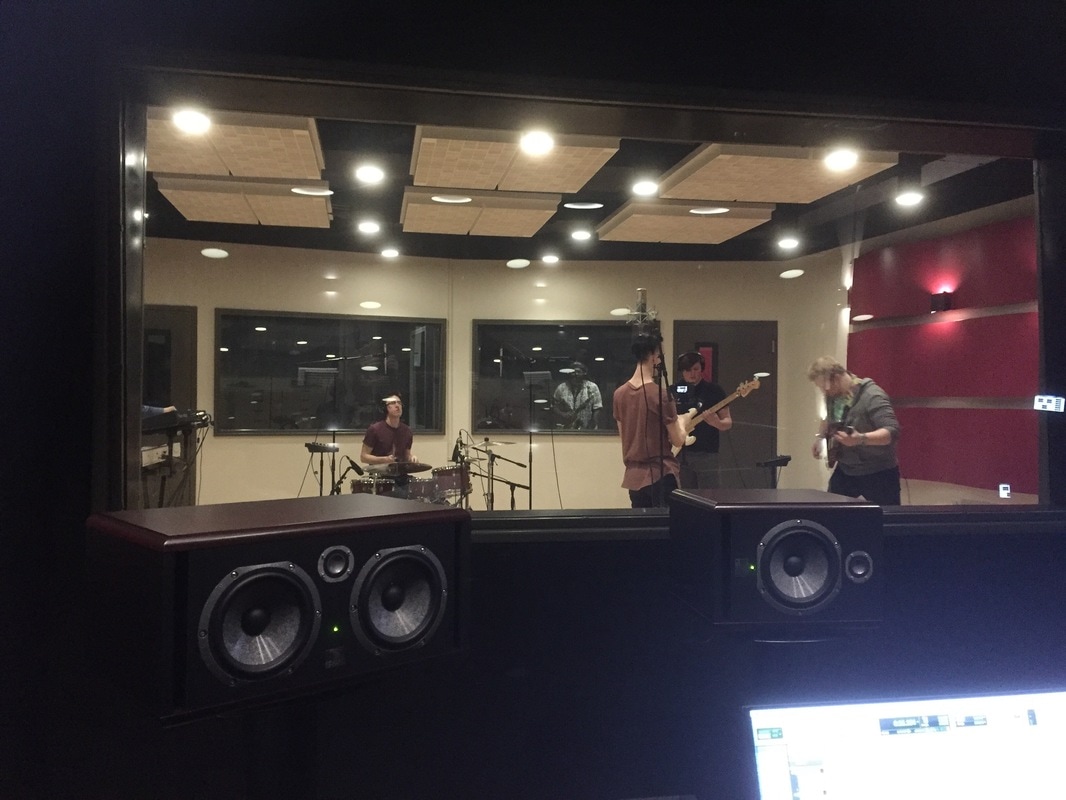
My team had a great recording session last week with the band "Funk Worthy." They are a funk/pop/rock group that want to get some material out so they can land some local gigs. The tune they chose to record was a cover of "If You Want Me To Stay" by Sly and the Family Stone. The instrumentation consisted of drums, bass, guitar, keyboard, vocals, and saxophone. We were able to use the new studio F on campus, which allowed for awesome natural drums sounds. We experimented with using some preamps that we weren't already familiar with, and also opted to route some instruments through some outboard compressors. We chose to use the Daking 500, API 525, Distressor, and a Chandler Germanium compressor. The band did 6 full takes, and they are considering some overdubs for guitar and vocals. They preferred to track everything at the same time rather than pause to fix one players' part.
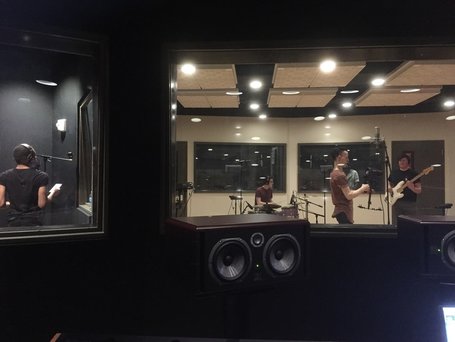
The sax player had an interesting setup where he clipped a lav mic onto his sax and ran that signal through a pedal board in order to add some interesting effects to his performance. We opted to take a DI feed from the guitar player with no effects, and also mic his amplifier with a close up ribbon and distanced AKG 214. We have plans to reamp the DI signal to see if we can get some cool tones from an amplifier. Since the bass player didn't play through an amp, we will send the DI signal through a virtual bass amp. We used great preamps from Vintech, Manley, Focusrite, Shadow Hills, and API. The bands performance was well rehearsed and aside from a few minor mental breaks, every take sounded super solid. One of our challenges was to keep the vocalist up on the mic since he was reading lyrics off of his phone while also trying to see the band, and as a result he would sing into the side of the mic. Below are some photos from the control room looking into the live room.
We made a video explaining our mic choice and preamp section. We apologize for the audio quality, the go pro unknowingly came loose within its case and jostled around a bit.
Slate Trigger is a very useful tool that is able to replace drum sounds with the high quality options available within the plugin browser, or any other samples that are in WAV or MP3 format. I employed trigger on the kick drum and snare drum on the mix that is embedded below. For a metal song, replacing the kick and snare really helped to provide the signature bombastic nature of the drums in accordance with the metal genre.
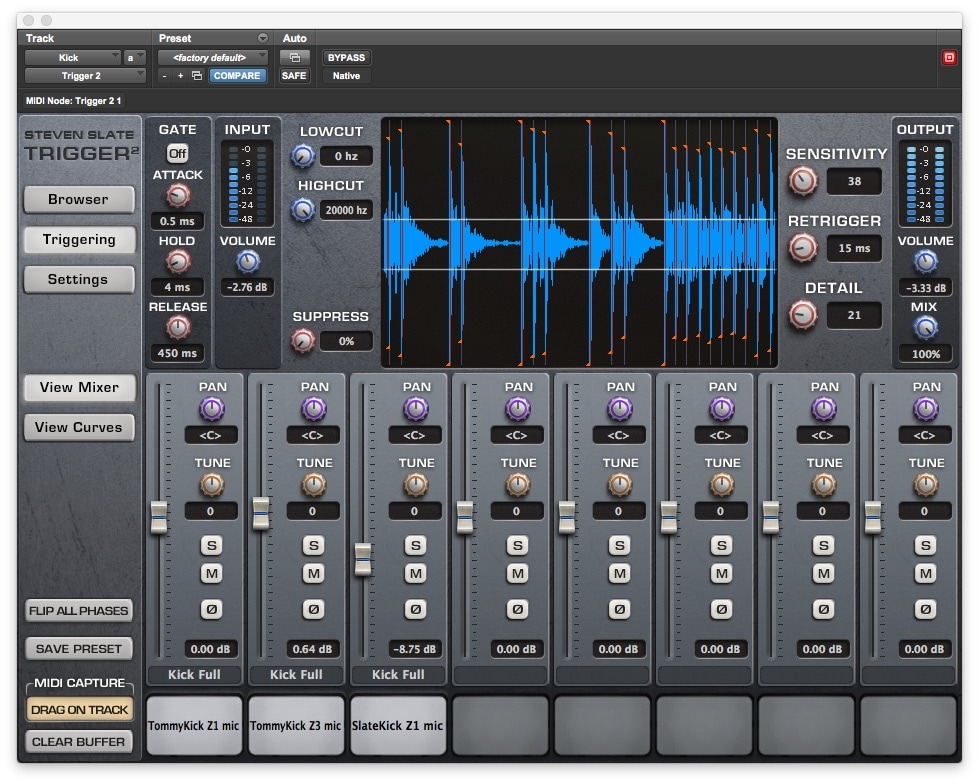
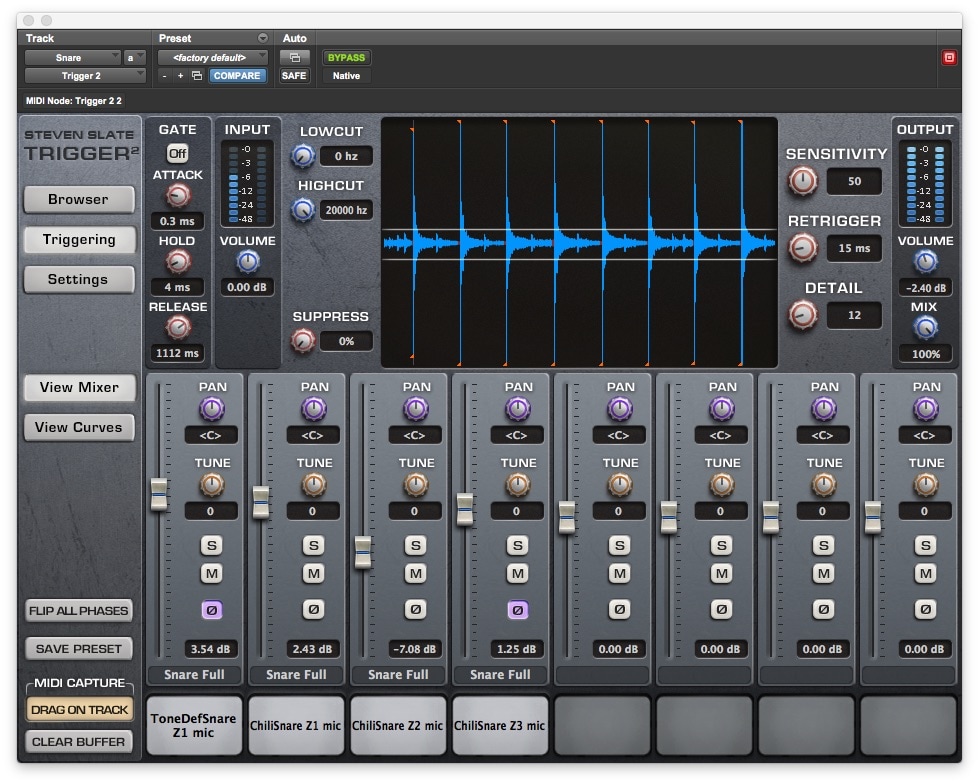
I first did some research about trigger so that I could familiarize myself with how the plugin functions. I found the following links to be most helpful. www.soundonsound.com/reviews/steven-slate-trigger www.youtube.com/watch?v=ziJi9MOnW0A Within trigger, I achieved a blend of two different kick drums that I liked and blended them to taste within the plugin. I then made sure that the sensitivity was set correctly and I wasn't hearing incorrect triggers of the replaced kick drums. A screenshot of my kick drum samples within trigger is shown below. I did the same thing with the snare, only this time choosing to blend four snare drums together. After adjusting the level of each sample, I flipped the phase on two of them since my ears liked the resulting sound. A screenshot of my snare drum samples within trigger is below. After achieving the sound I wanted within trigger, I then added subtle EQ and compression within Pro Tools in order to thicken up the sound just a bit.
Kick
Snare
|

 RSS Feed
